How to Acoustically Treat a Room for Recording on a Home-Studio Budget
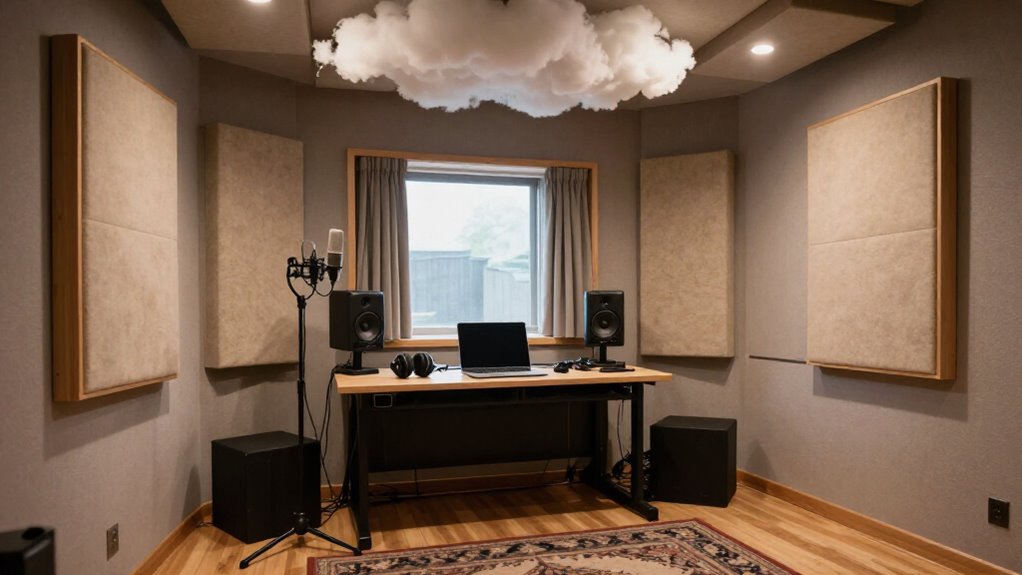
Start by placing your desk and monitors symmetrically, forming an equilateral triangle with tweeters at ear height. Use a mirror test to install matched 2-inch mineral-wool panels at side-wall reflections, then add a ceiling cloud and rear-wall absorption.
Measure bass around 60 Hz at several positions; add 4–6-inch corner traps only where unevenness persists. Use a staggered bookcase against flutter echo, mount panels safely, and compare REW measurements before and after.
Next, you’ll refine decisions.
Flatter Monitoring, Moderate, 6 Hours
For flatter monitoring in a moderate six-hour setup, first place your desk symmetrically along a room dimension, at least 1 foot from walls, with each monitor at least 8 inches from nearby surfaces and clear of corners. Form an equilateral triangle between both monitors and your listening position, then set each tweeter at ear height. This geometry maximizes direct consistency and stabilizes phantom-center imaging.
Use a mirror along each side wall: when you can see a monitor from your seat, mark that first-reflection location and repeat symmetrically. Spend remaining time testing free adjustments: alter speaker distance incrementally, use curtains, blankets, or bookshelves, and compare references. If available, run Room EQ Wizard. Apply EQ sparingly after placement and treatment; it can’t repair reflections or geometry.
Gather 2-Inch Mineral-Wool Panels
Gather matched 2-inch semi-rigid mineral-wool panels for the side-wall first-reflection points, where they’ll primarily reduce midrange and high-frequency energy. Use panels with consistent density, dimensions, and facing so each channel encounters comparable absorption. Two-inch stock is a practical broadband-control material, but its limited depth means it won’t substantially control bass; thicker 75 mm slabs near 60 kg/m³ extend useful absorption lower.
- Buy identical panels for left and right walls to preserve stereo symmetry.
- Select semi-rigid stock that holds its shape inside simple fabric frames.
- Plan a small rear air gap when mounting permits; spacing increases effective absorption.
Measure your available wall area before ordering, and obtain enough panels for both sides from one product line. Matching airflow resistance and thickness prevents imbalance between channels.
Step 1: Mark First-Reflection Points
With your matched mineral-wool panels ready, map the side-wall first-reflection points from the listening position before mounting anything. Sit in your mix position while a friend moves a mirror along one side wall at speaker height. Mark locations where you can see either monitor in the mirror; each visible path identifies an early-reflection zone. Repeat the test there, to preserve symmetry.
Position panels over these zones to attenuate reflections that blur stereo localization, alter tonal judgment, and obscure detail. Record the locations on a room sketch or floor plan before drilling, checking that panel centers align with the marked paths. Finally, inspect the ceiling above the listening position using geometry. If a speaker is visible, plan a ceiling cloud.
Step 2: Clear Rear-Wall Mounting Area
Clear the rear wall of furniture, shelving, cables, and other clutter before deciding where treatment belongs. An unobstructed surface lets you position panels or diffusers at points that control the most disruptive reflections. In a small room, prioritize absorption if the rear boundary produces strong reflected energy or audible flutter echo.
In a medium or larger room, diffusion can scatter rear-wall reflections and retain useful spatial character.
Measure the available wall width and height, then map panel locations before drilling. Mark each position in pencil, using a spirit level to keep edges aligned and gaps uniform. Check the layout against your left and right side treatment: the overall system should remain acoustically balanced. Don’t let an improvised rear-wall arrangement create uneven acoustic control or skewed imaging.
Step 3: Install Ceiling Cloud Above Mix Position
Install a ceiling cloud above the mix position to control the early ceiling reflection that can smear stereo imaging and reduce mix clarity. Identify the reflection point with a mirror: have an assistant slide it across the ceiling while you sit at the listening position. Mark each location where you can see a speaker, then center the cloud over the mix position so its coverage remains symmetrical relative to both monitors.
Use a rigid, broadband absorber and leave an air gap behind it; the gap improves absorption efficiency without increasing panel thickness. Before drilling, map the cloud’s footprint, mounting points, and cable lengths. Suspend the panel with plasterboard-rated fixings, cup hooks, and picture-hanging cable, or hardware rated for your ceiling type. Verify support capacity.
Step 4: Mount Corner Bass Traps
Mount bass traps in room corners to reduce low-frequency buildup that causes boomy, uneven bass at the listening position. Corners concentrate modal energy, so use traps 4–6 inches thick; this depth provides more useful low-frequency absorption than thin foam. On a limited budget, begin with two traps behind your listening position and keep the layout symmetrical whenever the room allows it. Even this small installation can reduce muddiness and improve bass consistency.
Mount large framed traps with brackets and sturdy fixings matched to their weight. If you’re fixing into plasterboard, use heavy-duty screws and appropriate anchors, not standard plastic wall plugs. For rigid-panel traps, leave a deliberate air gap behind each panel to increase effective absorption. Use wall- or ceiling-rated hardware, and verify every fixing safely supports load.
Step 5: Measure Decay With Clap Test
To gauge the room’s decay quickly, stand at the listening position and clap sharply once. Listen for a lingering tail, fluttering repeats, or a hollow ring; these cues indicate reflections and reverberation that remain uncontrolled. Repeat the test from several locations, because boundary spacing and surface geometry can change decay markedly across a small room.
Perform the same checks before and after installing panels or soft furnishings. A shorter, smoother tail suggests improved control, but don’t aim for complete silence: a usable room retains some natural reverberation. Treat this as a fast, subjective diagnostic, not a calibrated measurement. For objective analysis, use a measurement microphone with Room EQ Wizard to examine the room’s response and frequency-specific decay times with greater repeatability and useful detail.
Step 6: Vacuum Mineral-Wool Dust
After cutting or fitting mineral-wool panels, remove residual fibres before using the room for listening or recording. Vacuum the panels, work surfaces, and nearby floor areas with a HEPA-filtered vacuum, because fine dust can otherwise recirculate into the room. Move the nozzle slowly across fabric faces and seams without abrading the panel surface.
Wear gloves, eye protection, and a well-fitting respirator while you handle panels or clean up. Bag offcuts and dusty waste promptly, then seal and remove them from the workspace. Don’t sweep debris or use compressed air: both methods can suspend fibres and increase exposure.
Empty or service the vacuum according to its instructions, preferably outside the treated room. Inspect surfaces afterward and repeat vacuuming where dust remains visible or accessible still.
Confirm 60-Hz Bass Evenness
Measure the response around 60 Hz with Room EQ Wizard and a calibrated measurement microphone, as room modes can produce severe peaks or cancellations at this frequency. Measure at your listening position, then repeat sweeps at nearby locations. Compare 60-Hz levels: a substantial change signals uneven bass coverage, not a stable response.
Because room dimensions and monitor placement affect modal behavior, move monitors away from walls and corners, then retest. If unevenness persists, install bass traps in corners, where low-frequency energy builds up, and measure again. Finally, use familiar reference tracks at the primary position and nearby spots to verify consistent bass. A single sweep can miss location-dependent cancellations or exaggerations, so compare data before deciding whether treatment is necessary for monitoring and recording decisions.
Flutter Echo—Bare Wall: Bookcase
Once you’ve checked low-frequency consistency, assess bare parallel walls for flutter echo, a rapid series of reflections that smears transient detail and coloration in recordings.
A loaded bookcase provides economical scattering: its irregular geometry breaks repeated wall-to-wall paths rather than presenting one continuous reflective plane. Position it on a reflective wall near your listening or recording zone.
Stagger book depths, retain gaps, and expose uneven objects; a uniformly flush shelf reflects too efficiently. Clap sharply, then listen for the rapid decay before and after placement.
| Check | Target |
|---|---|
| Shelf fill | Dense, varied books |
| Surface profile | Uneven depths and gaps |
| Verification | Shorter clap-test ringing |
It complements absorption panels, yet it won’t correct modal bass problems; retain bass traps wherever measurements reveal low-frequency inconsistency in your room.
Retighten Mounting Hardware Quarterly
Each quarter, inspect and retighten the screws, brackets, anchors, hooks, and other fixings that support your acoustic panels and ceiling clouds. Loose hardware can let a panel shift, rattle, or fail, particularly when a heavy framed absorber is mounted on plasterboard or suspended overhead. Test each fastener by hand and examine its mounting point for play, cracking, compression, or wear.
Replace damaged components with fixings rated for the wall or ceiling material, rather than reusing unsuitable anchors. Confirm that brackets remain flat, hooks fully engage, and panel frames haven’t distorted. Humidity and temperature shifts can alter timber, plasterboard, and adhesive behavior across seasons. Pair this inspection with your quarterly acoustic re-test: listen for new rattles, verify cloud stability, and record any recurring movement promptly.
Conclusion
With strategically placed 2-inch mineral-wool panels, first-reflection absorption, a ceiling cloud, and rear-wall diffusion, you’ll create a more reliable home-studio monitoring environment without overspending. You’ve reduced early reflections and flutter echo while improving low-frequency consistency near 60 Hz. Recheck placement with measurements and familiar reference tracks, then adjust panel positions if response remains uneven. Vacuum exposed fibers, keep mounts secure, and inspect hardware quarterly.
Your recordings and mix decisions will translate more predictably in practice.
Audio Interface Buffer Size & Latency Calculator
Convert audio interface buffer size and sample rate to milliseconds, estimate round-trip delay with your own overhead, and view a latency chart.
Headphone Drive Check: Will My Interface Power These?
Estimate whether an audio interface can drive your headphones: power in mW, maximum SPL and margin to your own target, with every step shown.
Home Studio Room Calculator: Acoustic Treatment & Monitor Placement
Enter room size and finishes to get room modes, RT60 per octave, a panel count, monitor triangle, SBIR null and first-reflection points.
Recording Software Finder: Free & Paid DAWs and Recording Apps
Filter 23 verified recording apps and DAWs by price, license, platform, use case and feature, plus free DAWs bundled with interfaces.