How Many Bass Traps Do I Need for a Small Home Studio?
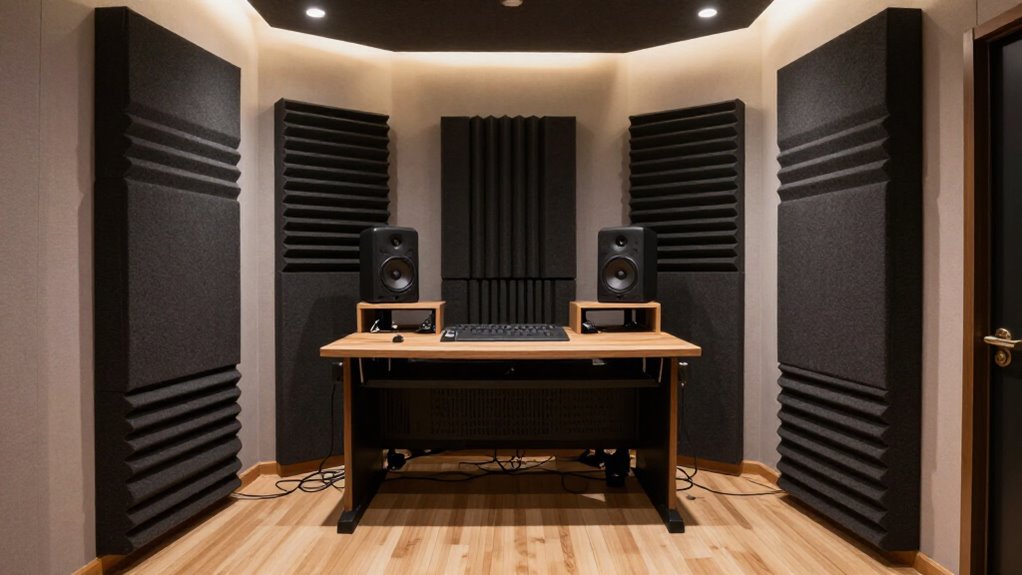
Start with four floor-to-ceiling 6-inch broadband traps, one across each vertical corner. If a door blocks one, treat three first and consider ceiling corners.
In a 10×12-foot room, you may ultimately need roughly 11 to 17 traps, but don’t buy them all at once. Use REW to measure 60 to 150 Hz decay, then add traps at persistent hotspots.
Keep vents clear, and reserve tuned membrane traps for confirmed resonances. Further steps show how measurements determine your final count.
Start With Four Corner Traps
Start with four bass traps, installing one in each vertical floor-to-ceiling corner of your studio. This layout addresses the corners where room boundaries concentrate low-frequency pressure and provides a practical treatment baseline for a small control room. Run each trap as close to the full floor-to-ceiling height as possible, because continuous coverage intercepts more of the corner volume than short sections.
If a door prevents treatment in one corner, install traps in the other three vertical corners first; don’t compromise door operation for a partial installation. Four corner traps establish the base system, not necessarily the final system. As your budget and available wall space increase, add traps to any remaining untreated corners, then address other confirmed bass hotspots. Prioritize verified untreated bass hotspots.
Target 60–150 Hz Decay
Target 60 to 150 Hz Decay
Once the corner baseline is in place, target decay times in the 60 to 150 Hz range rather than judging treatment by trap count alone. Use REW to measure your room, then inspect its waterfall or spectrogram. Identify frequencies that sustain longest, and place roughly 12–15 traps in rooms up to 10 m² only as an initial allocation. Use 16 cm-thick porous traps, preferably deeper, across floor-to-ceiling corners; their air gap improves low-frequency absorption. Re-measure after every change and treat strongest buildup first. Extend coverage to wall-to-ceiling corners or a ceiling cloud when measurements justify it. If a narrow resonance persists after broadband treatment, add a membrane trap tuned to the measured frequency.
| Stage | Action |
|---|---|
| Baseline | Measure 60 to 150 Hz decay |
| Placement | Treat corners first |
| Verification | Re-measure response |
Kick Drum 80 Hz Ringing
If your kick drum rings around 80 Hz after the hit, the room may be reinforcing an 80 Hz resonance rather than the sample or recording itself. Use Room EQ Wizard, or play low-frequency pink noise and measure with an SPL meter or phone app. Confirm whether 80 Hz is elevated, then map the positions where its decay is strongest.
Install treatment first at those bass hotspots, particularly vertical corners and wall-to-ceiling corners, where low-frequency pressure commonly accumulates. Thick porous traps with air gaps can reduce the buildup: a 6-inch (16 cm) panel straddling a corner produces about a 12-inch (30 cm) cavity. Add traps incrementally, remeasure the 80 Hz response after every stage, and compare decay as well as level. Results can vary.
Broadband vs Membrane Bass Traps
You’ll usually start with deep broadband porous traps, which absorb bass while also reducing mid and high frequencies. Add tuned membrane traps only when measurements reveal persistent low-frequency resonances that broadband treatment can’t adequately control. You can balance both types, and use range limiters where needed, to control bass without overdamping the room.
How Broadband Traps Work
Broadband bass traps form the core of most small-studio treatment because their porous material absorbs energy over a wide frequency range. As sound enters mineral wool or fiberglass, air particles move through the fibers. Friction resists that motion and converts a portion of the acoustic energy into heat, reducing reflections and modal decay.
Because porous absorbers respond to particle velocity, you’ll obtain stronger low-frequency performance where velocity is elevated. Mounting panels across room corners creates an air gap behind them, effectively increasing their working depth and improving bass absorption. Depth sets the practical low-frequency limit: 6-inch (16-centimeter) traps provide a useful starting point, while thicker traps extend meaningful control lower. They also attenuate midrange and treble, so you should distribute them to balance broadband decay.
When Membrane Traps Help
Porous broadband traps should handle the bulk of your small studio’s treatment, but membrane traps can address a narrow low-frequency resonance that remains after adequate corner trapping. Build sufficient depth and air gaps into porous absorbers, because those variables govern their low-frequency effectiveness while also controlling mids and highs. Then measure the room: a waterfall graph or spectrogram can reveal whether a strong, persistent modal peak survives.
If it does, select a membrane trap tuned to that frequency and position it where the resonance couples effectively. Its selective action preserves more mid- and high-frequency energy than additional porous treatment. Don’t use membrane units as your first or sole solution; they’re a measured finishing treatment, not a replacement for broad corner coverage throughout the room.
Choosing The Right Mix
Most small home studios need a broadband-first strategy: install 6-inch (16 cm) or deeper porous traps across corners, where the mounting gap increases low-frequency absorption while the material also controls mids and highs. Use these traps as your foundation because they address a wide bandwidth and improve overall decay behavior.
Add coverage progressively, then measure the result; additional porous area can consume valuable room volume and increasingly damp midrange and treble. After extensive broadband treatment, inspect a waterfall graph or spectrogram for narrow, persistent low-frequency resonances. If one or two modes still decay excessively, add membrane traps tuned to those measured frequencies. Don’t use membrane units as a substitute for adequate porous trapping: they target specific bands and won’t provide broad modal control needed.
Concrete Walls Require More Trapping
Concrete walls return more low-frequency energy to the room, so you’ll need greater trap coverage to control modal buildup. Place thick traps deeply in floor-to-ceiling corners first, where particle velocity and bass accumulation are highest. Expand treatment to wall-to-ceiling and wall-to-floor corners as measurements indicate, adding coverage incrementally to avoid excessive high-frequency damping.
Stronger Low-End Reflections
Because dense concrete boundaries absorb very little low-frequency energy, they reflect bass back into the room and intensify modal peaks, nulls, and localized hotspots. A 100 Hz wavelength spans about 3.4 m (11.2 ft), often matching your room’s dimensions and reinforcing uneven pressure patterns. You thus need greater low-frequency absorption than you’d use in rooms with less rigid boundaries.
Begin with thick porous traps across floor-to-ceiling vertical corners and wall-to-ceiling corners. Run low-frequency pink noise and measure levels at multiple listening and boundary positions with an SPL meter or phone app. If peaks persist, add traps at the measured hotspot areas first, then extend coverage to remaining corners and ceiling surfaces as needed while verifying additions reduce spatial level variation across your monitoring area.
Deeper Trap Placement
To counter the stronger bass buildup from rigid concrete boundaries, prioritize trap depth and corner placement over thin, flat wall panels. You’ll gain more effective low-frequency absorption when porous material measures at least 6 inches (16 cm) deep. Mount each panel across a wall-to-wall junction, because the rear void increases its effective working depth.
| Placement | Build | Purpose |
|---|---|---|
| Wall-to-wall corner | 6-inch porous panel | Approximately 30 cm rear air gap |
| First installation | Four traps | Establish baseline control |
| Small concrete room | 12 to 15 traps, if needed | Address persistent buildup |
Add units gradually after you measure or hear persistent modal peaks. In rooms up to 10 m², concrete reflection can justify the higher count. Prioritize depth before adding thin panels; thicker absorbers maintain useful action at lower frequencies.
Expanded Corner Coverage
Since concrete surfaces return a high proportion of low-frequency energy, you’ll often need broader corner coverage than in a framed, drywall room. Start by treating the four vertical corners from floor to ceiling, where three boundaries concentrate modal pressure. If a door prevents full coverage in one corner, treat the other three first and preserve as much continuous height as possible.
When budget and clearance permit, extend trapping along eight wall-to-floor and wall-to-ceiling junctions. You can also bridge wall-to-wall-to-ceiling and wall-to-wall-to-floor intersections to increase absorption area at boundary pressure maxima. Use four corner traps as your baseline, then add panels incrementally while measuring decay times and response consistency at the listening position. In compact concrete rooms, controlling buildup may require 12 to 15 traps overall.
10×12 Room Mix Translation
In a 10×12-foot studio, uneven bass response can make you over- or under-adjust low end, causing mixes to translate poorly outside the room. With 120 square feet, or about 11.1 m², a guideline of one to 1.5 traps per m² indicates 11 to 17 traps; 12 to 15 is a practical starting range.
Install floor-to-ceiling treatment in the front corners behind monitors and rear corners first. Then cover available wall-to-ceiling and wall-to-floor corners. Measure response at your listening position and locations with Room EQ Wizard, because modal peaks and nulls shift with position.
If low frequencies remain inconsistent, add corner coverage or a thick ceiling cloud. Recheck your decisions on headphones, cars, and playback systems: smoother in-room bass improves translation, but layout and construction determine the treatment requirement.
Don’t Block HVAC Vents
Keep every bass trap clear of HVAC supply and return vents: blocking either opening reduces airflow, can increase system noise, and may create uncomfortable temperature differences in a small studio.
Treat vent clearance as a constraint when you map corner treatment. If a wall or corner overlaps a register, relocate the trap rather than covering the grille or restricting its throw. Account for doors and windows, because these features reduce usable boundaries in compact rooms. When corners are unavailable, use suitable ceiling corners that preserve service access and unrestricted air circulation.
Verify that supply air can enter and distribute across the room, while return air can reach its intake without added resistance. This doesn’t compromise ventilation performance and helps you maintain working conditions during long sessions.
Treating Foam as Bass Traps
After you preserve HVAC airflow and usable access, assess foam by thickness rather than its label. Thin acoustic foam mainly controls midrange and treble; it isn’t a credible bass trap. Porous absorbers work when moving air rubs through open-cell material, converting sound energy into heat. For meaningful low-frequency absorption, use about 6 inches (16 cm) or more of foam or comparable porous material.
- Mount a 6-inch panel across a corner to create roughly 12 inches (30 cm) of extra air space behind it.
- Choose lower-density material for deep traps so bass can enter rather than reflecting at the face.
- Limit coverage: porous treatment also absorbs mids and highs, so excessive foam can leave your small studio unnaturally dead and erase its tonal contrast prematurely.
Run a REW Frequency Sweep
Run a Room EQ Wizard (REW) sweep through your monitors and measure it at the listening position to expose bass peaks and nulls that listening alone can misidentify. The response curve lets you locate frequencies needing treatment instead of judging the room by ear. Keep the measurement microphone fixed at the same listening position for every comparison. Add or relocate one trap at a time, then repeat the sweep.
Compare plots to determine whether each change reduces the peak or fills a dip; don’t assume more absorption improves the response. Check REW’s waterfall graph or spectrogram alongside frequency response. These displays reveal decay time, showing whether low-frequency modal energy continues ringing after the sweep. Persistent resonances may justify more corner trapping or different placement.
Conclusion
Start with four corner bass traps, then measure room rather than guessing. Use REW sweeps to assess 60 to 150 Hz decay and identify kick-drum ringing near 80 Hz. Choose broadband traps for modal control; add membrane units for narrow resonances.
Concrete boundaries usually demand more absorption. In a 10×12 room, verify improved mix translation after each change. Don’t obstruct HVAC vents, and don’t mistake thin foam for effective bass trapping. Add traps until decay is consistent.
Headphone Drive Check: Will My Interface Power These?
Estimate whether an audio interface can drive your headphones: power in mW, maximum SPL and margin to your own target, with every step shown.
Home Studio Room Calculator: Acoustic Treatment & Monitor Placement
Enter room size and finishes to get room modes, RT60 per octave, a panel count, monitor triangle, SBIR null and first-reflection points.