How to Hang Acoustic Panels Without Damaging Your Walls
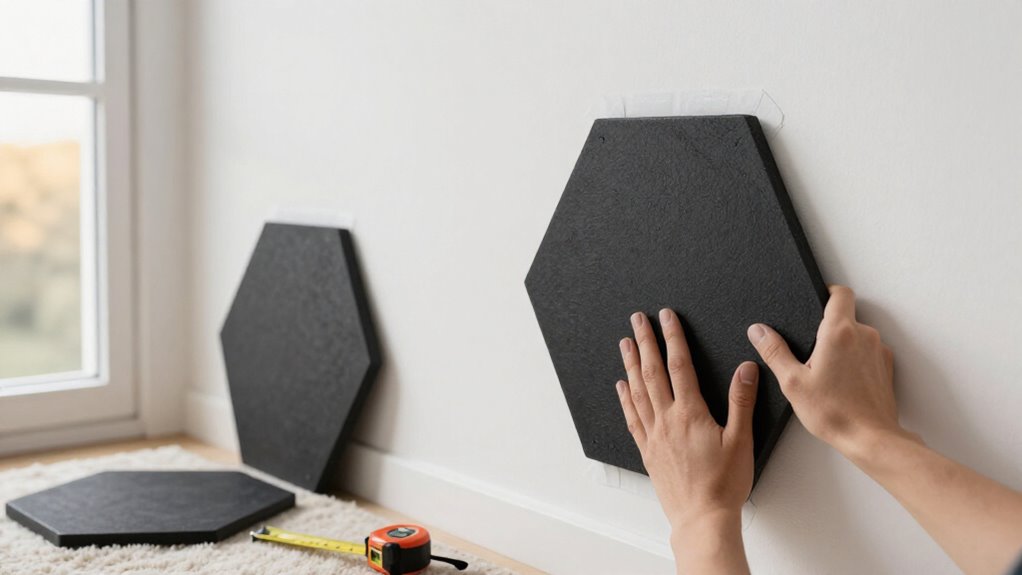
To hang acoustic panels without damaging walls, choose removable adhesive strips rated above each panel’s weight and compatible with its backing and your paint. Test 70% isopropyl alcohol in a hidden spot, then lightly clean and fully dry the contact areas.
Level and pencil-mark positions, apply strips near corners, and press panels evenly without sliding. Let adhesive cure as directed, then inspect edges after 24 hours.
Continue for clip fixes, seam checks, and monthly cleaning.
Beginner-Friendly Mounting in 30 Minutes
You can mount lightweight acoustic panels in about 30 minutes without drilling by using removable adhesive strips rated above each panel’s weight. Choose panels that remain within the strip manufacturer’s load limit, including any safety margin. Wipe the mounting area with isopropyl alcohol, then allow it to dry completely; dust and skin oils reduce adhesion.
Measure the layout and apply painter’s tape as temporary position guides, keeping edges aligned and gaps consistent. Install the adhesive on each panel according to its instructions, applying even pressure for the specified time. Let the bond cure for the stated interval, one hour, before placing panels on the wall. For heavier panels, use a freestanding frame or floor stand; adhesive can fail and pull paint from the surface.
Gather Adhesive Strips and Level
Start by selecting removable adhesive strips rated above your panel’s weight, using the package’s recommended strip count and confirming compatibility with both the wall finish and the panel backing.
- Verify the stated weight capacity exceeds the panel weight.
- Match adhesive to your paint, finish, and panel backing.
- Keep a bubble level and sharp pencil ready.
- Mark identical strip locations on both mounting surfaces.
Review the strip maker’s preparation instructions before installation; don’t substitute products or exceed its rated configuration. Position your level at the planned top edge, then draw a faint guide you can erase later. Measure spacing from that line and copy each mark onto panel. Following the pattern distributes load evenly, keeps the panel flat, and reduces stress on the wall finish.
Step 1: Degrease Wall With Alcohol
With your strip locations marked, wipe each intended wall contact area with a lint-free cloth lightly dampened with 70% isopropyl alcohol. Test the alcohol first on an inconspicuous spot, especially if your wall has painted, varnished, or plastic surfaces, because it can dull or damage certain finishes. Work in small sections, turning to a fresh part of the cloth after each pass so you lift oils, dust, and residue instead of redistributing them.
Don’t saturate the wall; a light wipe is enough. Allow each cleaned area to air-dry completely, usually for several minutes, before you apply adhesive strips or mounting hardware. Keep alcohol away from flames and heat sources, ventilate the room, and follow its label’s safety directions throughout installation at all times.
Step 2: Mark Panel Corners With Pencil
Once the wall has dried, hold the first panel in its planned position and use a level to align its top edge. Make tiny, light pencil marks at each corner, so you can erase them easily after installation. Avoid pressing hard; deep lines or dents can remain visible around the panel perimeter.
Measure the corner offsets from your chosen reference points, then repeat those same measurements for every panel. This keeps gaps uniform across the wall. If you’re creating an air gap behind a panel, mark its wall position rather than tracing the front edge. Before proceeding, check every corner mark against your layout and nearby furniture. Confirm alignment, spacing, and clearance now; moving panels later can leave stray pencil marks or wall dents.
Step 3: Apply Strips to Panel Backs
Before attaching anything, inspect the panel back to confirm it’s smooth, clean, and fully dry; dust, loose fibers, or textured fabric can reduce strip adhesion. Choose removable adhesive strips rated for your panel’s total weight, and follow the package’s weight and strip-count guidance. Position one strip near each corner, keeping its pull tab exposed and accessible. For heavy panels, add strips at even intervals across the back so the load distributes evenly.
Peel the protective liner from each panel-side strip only when you’re ready to install it. Press that fastening side firmly onto the panel for the manufacturer’s specified application time. Don’t cover, fold, or trim the release tabs; you’ll need them accessible for clean removal later. Let adhesive then set fully as recommended.
Step 4: Hold Each Panel 30 Seconds
Align the panel with your placement marks, then press it firmly against the wall for a full 30 seconds. Keep it level and still while the adhesive strips or mounting tape begin to grip. Use even hand pressure across the panel’s face instead of pushing only at the center.
Work your hands over each adhesive point, applying steady pressure without bending the panel or grinding it against paint. This distributes force to every adhesive point and helps prevent edge lift or uneven contact. Don’t slide or readjust panel during hold; movement can weaken initial bond and mark wall surface. If your mounting product specifies a different pressing duration or a required wait before installation, follow its instructions rather than relying on the 30-second guideline.
Step 5: Test Bond After 24 Hours
After 24 hours, inspect the panel to confirm it remains level, flush, and fully seated against the wall. During this curing period, keep the room within the adhesive manufacturer’s recommended temperature and humidity range, since unsuitable conditions can weaken the bond. Check each edge for gaps, lifting, or downward movement.
Then use light, even pressure near the corners and along the perimeter to verify that the panel is secure. Don’t pull the panel outward or try to peel an edge back; doing so can release the removable strips and damage the wall surface. If the panel shifts or an edge lifts, support the panel’s weight immediately. Follow the adhesive manufacturer’s removal instructions, reapply strips as directed, and remount the panel without forcing it.
Step 6: Erase Pencil Marks Gently
Once the panel has cured securely, remove any visible layout marks with a white vinyl eraser tested first in an inconspicuous area. Work around the panel edges using short, controlled strokes and only enough pressure to lift the graphite. Don’t scrub: excessive force can burnish painted surfaces, flatten wall texture, or damage wallpaper. After each section, sweep eraser crumbs away with a soft, dry cloth.
Don’t rub debris into the finish, since trapped particles can leave smudges or abrasion marks. If a line remains, use a clean kneaded eraser. Press it lightly onto the pencil mark, then lift it straight away; repeat as needed rather than scrubbing. Avoid abrasive erasers, damp cloths, and liquid cleaners, which can dull paint, disturb wallpaper, or leave stains.
Inspect Seams for Wall Gaps
Before positioning the acoustic panels, inspect every wall seam, including corners and the edges around windows, doors, and trim, for visible cracks or gaps. Shine a flashlight parallel to each seam; side lighting reveals narrow openings, lifted edges, and uneven surfaces that overhead light can hide. Slide a thin strip of paper or a feeler gauge into suspicious lines to determine whether the gap opens through the seam or is only a surface mark.
Measure each gap’s length and width, and record its location. These notes help you select an appropriate removable seal or shift panel placement without drilling into compromised areas. Don’t cover a damp seam, active leak, or moving crack. Correct the moisture or issue first, then reassess the wall before mounting.
Corners Peel: Add Mounting Clips
If a panel corner begins to peel despite a sound wall surface, secure the loose edge with a small mounting clip. Select a clip that matches the panel’s thickness and weight, then use only the manufacturer-recommended fastener or adhesive. Place it over a firm edge section, never fabric alone, so pressure won’t tear the facing.
| Check | Requirement | Action |
|---|---|---|
| Clip type | Thickness-rated | Match panel |
| Wall method | Removable, load-rated | Press firmly |
Install matching clips at corresponding corners to distribute force evenly. Before committing, verify each removable wall-safe adhesive clip’s rated load exceeds the corner’s share of panel weight. Clean and dry the contact area, then press the clip securely or fasten it as directed. Keep the clip snug against the edge without compressing the acoustic core.
Vacuum Panels Monthly With Brush
Each month, vacuum acoustic panels with a clean, soft-bristle upholstery or dusting brush to remove surface dust before it settles into the fabric. Before cleaning, confirm manufacturer permits vacuuming for panel’s fabric, finish, and mounting system. Fit brush attachment, set suction low, and test an inconspicuous edge. This is important for loosely woven or fabric-wrapped panels.
Support panel with a hand if mounting allows, but don’t press it toward wall or disturb adhesive strips, clips, or hook-and-loop fasteners. Glide the brush in gentle passes. Avoid seams, corners, exposed fibers, and panel edges, where snagging can loosen covering or affect attachment. Don’t use a hose, rotating beater brush, or high suction. Regular cleaning keeps dust from embedding while helping panels and mounting hardware remain undisturbed.
Conclusion
You can mount acoustic panels securely without sacrificing your paint or drywall by cleaning, leveling, and using removable adhesive strips rated for each panel’s weight. Check every edge after installation, then reinforce lifting corners with damage-free clips rather than extra glue. Keep the panels dust-free with a soft brush vacuum attachment, and follow the adhesive manufacturer’s removal instructions when you relocate them. You’ll preserve both acoustic performance and a clean, repair-free wall surface for years.