Do I Need an Audio Interface for a MIDI Keyboard? USB MIDI vs Audio Explained
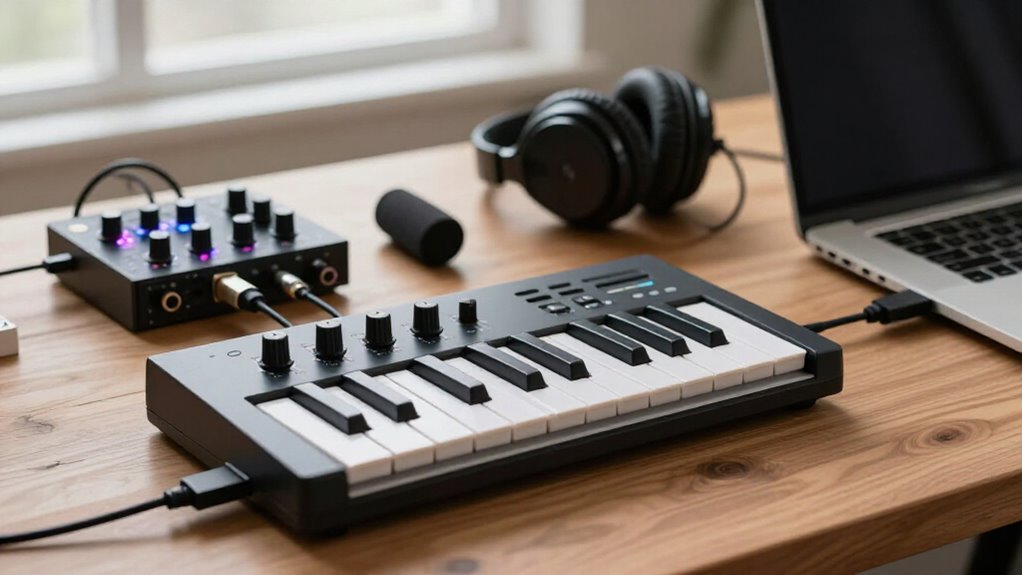
You don’t need an audio interface to use a USB MIDI keyboard with your computer or iPad: connect it directly, select it in your DAW, and play virtual instruments.
MIDI sends notes, velocity, pedals, and controller data, not sound.
You need an audio interface when you record a hardware synth’s audio outputs, microphones, or other line-level sources.
USB and DIN MIDI both carry control data; route audio separately.
Details below help configure connections and monitoring.
USB MIDI Needs No Interface
If your keyboard sends MIDI over USB, connect it directly to your laptop or PC, no separate MIDI or audio interface is required.
Your DAW receives note-on, note-off, velocity, and continuous-controller messages through the keyboard’s USB MIDI connection. In Cakewalk, or another DAW, open the MIDI input settings, select the keyboard, arm a track, and record or play immediately. USB MIDI transfers these control messages with no meaningful playback delay compared with DIN MIDI.
You only need a dedicated MIDI interface when your setup requires additional DIN ports for multiple external devices. For one keyboard with a built-in USB MIDI port, the direct connection is simpler, uses fewer cables, and provides all the MIDI input capability your DAW needs for standard recording and instrument control.
MIDI Carries No Audio
MIDI carries performance instructions, not sound. When you press a key, your keyboard can send a note-on message, its velocity, a note-off message, controller changes, or pedal data. These messages contain no waveform, sampled tone, or other audio signal. Your DAW, virtual instrument, or sound module must interpret them and generate the sound you hear.
USB MIDI and five-pin DIN MIDI transport the same type of control data. USB doesn’t turn MIDI into audio, and connection type isn’t usually the main source of timing delay; software and driver settings matter more. A MIDI port can address 16 channels and control several compatible devices, yet it still sends only commands. To hear sound, you need speakers or headphones connected to your computer audio hardware or interface.
Tracking Hardware Synth Audio
When you control a hardware synth from your MIDI keyboard, send MIDI over USB or DIN for performance data and connect the synth’s audio outputs to your audio interface to capture its sound. MIDI carries note and control messages, not audio, so you must record the synth’s analog output separately.
Connect its line-level outputs to matched line inputs on the interface; don’t use a mic preamp unless you attenuate and set gain appropriately. Headphone outputs can work, but set their level conservatively to prevent clipping. Monitor through your DAW and choose a low, stable audio buffer, because interface latency determines how responsive the tracked sound feels. If the synth provides USB audio, you can record it directly, though interface inputs often provide simpler routing.
USB, DIN, and Audio Paths
You can connect a USB MIDI keyboard directly to your computer, where it sends and receives MIDI data through your DAW. With DIN MIDI, you use separate OUT and IN connections, often through an interface, for one-way control-data paths. Neither connection carries keyboard audio, so route your synth or DAW instrument’s audio to your interface or computer outputs.
USB MIDI Data Path
A USB MIDI keyboard sends note, velocity, controller, and transport messages to your computer as digital USB data; your DAW or software instrument interprets those messages and generates the audio.
The keyboard itself doesn’t send sound over that connection. It sends performance instructions, such as which key you pressed, how hard you pressed it, pedal positions, and parameter changes. Your computer receives them through the keyboard’s USB MIDI driver, assigns the device as an input in your DAW, and passes them to the selected instrument track or plug-in.
You monitor the resulting audio through your computer or an audio interface. In practice, buffer settings and the audio driver determine most perceived playing latency, rather than USB MIDI’s small data load in typical software setups.
DIN MIDI Connections
DIN MIDI uses 5-pin cables to carry performance data, notes, velocity, and control changes, not audio, with each cable sending data in one direction from MIDI OUT to MIDI IN. Connect your instrument’s OUT port to a module’s IN port; one cable doesn’t provide two-way communication. Use another cable for return data.
If your keyboard sends MIDI over USB, a USB-DIN interface lets your computer exchange messages with synth modules. MIDI THRU forwards received data to another device, supporting daisy chains. Avoid loops, duplicate routing, and mismatched channels; they can create echoes or unintended triggering. DIN can reduce some USB-related ground-loop hum risks because it uses a separate connection path. It still carries no sound, so use appropriate audio cables to send its sound onward to speakers.
Audio Routing Requirements
MIDI connection choice determines how performance data reaches your computer, while the audio interface handles the DAW’s sound on its way to monitors or headphones. With a USB keyboard, the MIDI path is keyboard USB to computer. Your interface isn’t carrying MIDI; it converts the DAW’s audio output for your monitors or headphones.
With a DIN-only keyboard, connect MIDI OUT to an interface’s MIDI IN, or to a standalone MIDI interface, then route it to the DAW. In either setup, audio follows a separate route: computer/DAW to interface, then analog outputs or S/PDIF to monitoring. Switching between USB and DIN changes only where MIDI enters the computer, not the audio path. DIN can reduce ground-loop hum, but audio exits through the interface’s analog outputs.
iPad Class-Compliant Compatibility
Class-compliant USB MIDI lets you connect a compatible keyboard to your iPad without installing drivers, carrying note, velocity, and controller data to your synth app. You can usually connect through a USB Camera Adapter or compatible USB hub, but the iPad must recognize the keyboard as a USB MIDI device.
If it doesn’t appear, use a powered hub to meet the keyboard’s current requirements and check your app’s MIDI settings.
What Class-Compliant Means
When a USB keyboard is class-compliant, it follows standard USB MIDI protocols that let an iPad recognize it without a manufacturer-specific driver. This driverless compatibility lets your music apps receive standard MIDI data, including note messages, velocity, pitch bend, modulation, and CC commands from knobs, sliders, or pedals. iPadOS doesn’t need manufacturer setup software to interpret those standard performance messages reliably directly.
Class compliance doesn’t guarantee access to every function. Manufacturer editor software, patch libraries, firmware tools, and display-based configuration may require a vendor app or computer driver. Basic MIDI playback can still work while those deeper functions remain unavailable. Also check the controller’s USB power requirement: a class-compliant model can fail to operate if it draws more power than the iPad’s USB adapter supplies.
Direct iPad Connections
Connect a class-compliant USB keyboard directly to your iPad, and iPadOS will usually recognize it as a MIDI input without a driver. In your music app, select the keyboard as the MIDI input, then play notes, trigger instruments, and map supported knobs, faders, or pads. The connection carries MIDI data: note messages, velocity, timing, and controller commands.
It doesn’t transfer the keyboard’s sound to the iPad, because MIDI contains performance instructions rather than audio. Instead, the app’s software instrument generates sound, which you hear through the iPad’s audio output. This setup lets you use a keyboard controller with GarageBand, Logic Pro for iPad, or other compatible apps without an audio interface. Add an interface when you need dedicated audio inputs, external audio routing, recording, or low-latency monitoring.
Power And Adapter Needs
For direct iPad use, a class-compliant USB-MIDI keyboard usually needs no driver or audio interface: connect it through the appropriate USB-C hub or Apple Camera Adapter, and iPadOS can recognize it as a MIDI input. That connection carries MIDI data, not necessarily operating power. Check its power design. Bus-powered models draw power through the hub, but it must supply enough current for reliable enumeration. If the keyboard flickers, disconnects, or never appears in your music app, use a powered hub or compatible pass-through charger.
A keyboard with USB-MIDI but no USB-power capability still needs its specified external adapter. Match the required voltage, polarity, and amperage; MIDI can’t replace the power supply. You need an audio interface only for microphone, line-input, or dedicated audio-output connections.
Controlling DAW Virtual Instruments
A USB MIDI keyboard sends note, velocity, sustain-pedal, and other controller messages to your DAW, which routes them to a virtual instrument plugin. The plugin contains the sound engine, so you don’t need an audio interface to play it; you need an audio output device to monitor it.
| Task | Setting | Result |
|---|---|---|
| Input | Select keyboard port | Notes arrive |
| Track | Set MIDI channel | Targets plugin |
| Pedal | Enable CC64 | Sustain responds |
| Timing | Lower audio buffer | Tighter response |
If your DAW accepts multiple MIDI inputs, choose this device, so transport and automation messages don’t trigger the wrong instrument. Assign channels per track when needed: one port carries 16 MIDI channels, letting you address plugins. Keyboard latency follows the DAW’s audio-buffer and ASIO configuration, not USB versus DIN.
USB Hub Power Limitations
Although USB carries both MIDI data and power, a hub’s available current can limit a bus-powered keyboard. USB MIDI itself needs little bandwidth, but your controller also draws power through that connection. A hub shares its total current budget among connected devices, and its available output may be lower than a direct computer port. If demand exceeds the budget, the keyboard may fail to start fully or repeatedly disconnect and reconnect.
Choose a self-powered hub for keyboard controllers. Its external supply delivers regulated 5V power without relying solely on your laptop’s or PC’s USB allocation. With an unpowered hub, reduce attached devices or try another computer port. Check the keyboard’s current requirement and the hub’s per-port and total ratings before troubleshooting MIDI setup issues.
MIDI Thru Does Not Merge
Power solves only one side of a multi-keyboard MIDI setup: a MIDI Thru port does not merge data from multiple sources. Thru copies incoming MIDI bytes to its output; it doesn’t combine, prioritize, or alter messages.
- It accepts one incoming stream per connection.
- Its OUT/THRU path sends data in one direction.
- Two keyboards can’t feed one synth through Thru alone.
- Shared channels can produce conflicting note messages.
- Use a MIDI merger or multi-input interface instead.
If both controllers must play one destination, connect them through hardware that explicitly supports merging. This creates a single combined MIDI stream for the synth. For recording and editing, keep each keyboard available as a separate input, then route or record each source rather than assuming Thru consolidates them.
Check DAW MIDI Settings
Configure the DAW to listen to the exact MIDI port carrying your keyboard’s data, not a generic “All Inputs” option. Select the device name shown by your connection, such as “Oxygen Pro USB” or “Keyboard MIDI,” as the track’s input or record source. This prevents another controller from being recorded.
Enable input monitoring or arm the instrument track, so you can hear note-on and note-off messages while testing. If you’re using USB and MIDI DIN connections, select either the keyboard’s USB port or the audio interface’s DIN input, whichever carries the notes. In Cakewalk or BandLab, choose that controller from the MIDI input dropdown. If notes still don’t trigger, match the track’s receive channel to the keyboard’s transmit channel; each port supports 16 channels.
Conclusion
You don’t need an audio interface to use a USB MIDI keyboard with your DAW or class-compliant iPad; MIDI sends performance data, not sound. You need an interface only when you record or monitor audio from hardware synths.
Route USB or DIN MIDI deliberately, configure DAW inputs, and remember that MIDI Thru doesn’t merge messages. If you add devices, use a powered USB hub to avoid current limits. Keep MIDI paths and audio paths separate.