How to Find First Reflection Points With the Mirror Trick
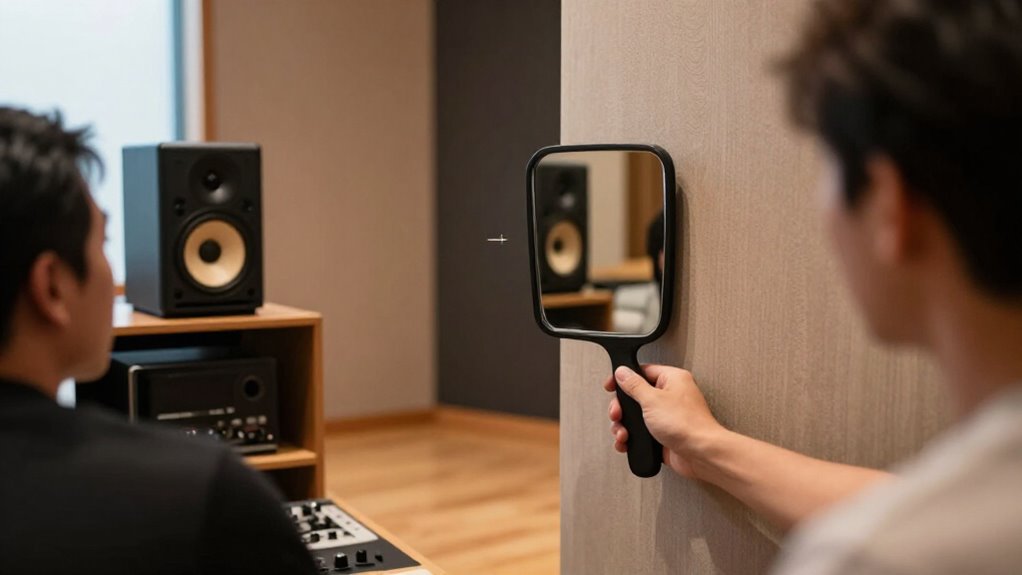
Sit at your normal listening position and keep your head still. Have a helper hold a small, flat mirror flush to one side wall at tweeter height, then slide it slowly along the wall. Mark each spot where you can see either monitor’s tweeter, and repeat on the opposite wall.
Verify the marks without moving your chair, then place absorptive panels over them, extending beyond each point. Next, you’ll confirm coverage and account for changes.
Mark Monitor-Visible Reflection Points
Sit at your usual listening position while a helper slides a small mirror along one side wall at monitor height. Keep your head centered and maintain your normal seated posture. As the mirror moves, watch for either monitor to become visible. Immediately mark that wall location with removable painter’s tape or a sticky note. Each visible monitor identifies that speaker’s first sidewall reflection point.
Continue along the entire wall, marking every location where a monitor appears. Then repeat the procedure on the opposite side wall. Don’t assume symmetry: left and right monitors can produce different reflection locations. If you use more than one listening position, return to each seat individually and repeat the scan. Even small listener movements can shift the visible reflection points.
Gather a Hand Mirror
Gather a small hand mirror and painter’s tape or sticky notes before you begin the test. Select a mirror with enough reflective area to show one monitor when it is placed flat against a wall at speaker height. A phone screen can substitute if its surface produces a clear, undistorted reflection. Prepare your marking material so you can label each confirmed location immediately.
- Sit at your normal listening position, with your head at its usual height.
- Ask a helper to carry and move the mirror; you shouldn’t leave the seat during observation.
- Keep the mirror available for the side walls and, when your setup requires it, the front wall, rear wall, or ceiling.
Mark each location with painter’s tape or sticky notes.
Step 1: Clear Side-Wall Obstructions
Before the mirror test, clear the side-wall areas of mirrors, glass, wooden ornaments, and other reflective objects that could create unwanted sound reflections. Remove or relocate anything that occupies the direct path between either speaker and your listening position. A clear wall surface prevents false visual cues and lets the mirror reveal the true first-reflection location. Leave enough open wall area for your helper to slide the mirror smoothly at speaker height.
Sit in your usual position while the helper moves it along one wall, then the other. Mark every location where you can see either speaker in the mirror with painter’s tape or a sticky note. Keep these marked areas free until treatment. Later, position an absorptive panel so it covers each point.
Step 2: Center Your Listening Position
Start from your normal listening or mixing position, since the mirror test must represent the geometry you use to evaluate the speakers. Sit exactly where you normally make tonal, balance, and imaging judgments; don’t shift forward, recline, or lean to one side. Place your chair midway between side walls so left and right reflection paths remain balanced as practical for symmetry.
Set your head at your usual listening height, including the posture you maintain during critical listening. Keep that height consistent while a helper performs the test at speaker height. If your room serves more than one listener, establish each seat independently. Even small changes in seat location or head position alter the apparent reflection geometry. Mark each resulting spot with removable painter’s tape.
Step 3: Slide Mirror Along Wall
With your seat position fixed, have a helper hold a small mirror flat against one side wall at the same height as the speaker drivers. Keep the mirror parallel to the wall, and make certain its reflective face doesn’t tilt upward, downward, or toward the room. From your normal listening position, instruct the helper to move it slowly and continuously along the wall between the speaker plane and your seat. Maintain a constant height and flush wall contact throughout the pass. Use a controlled pace so you can identify the relevant location without overshooting it.
When you reach the required position, mark the wall precisely with painter’s tape or a sticky note. Then repeat the same controlled sweep on the opposite side wall, preserving alignment.
Step 4: Spot Each Speaker in Mirror
From your listening position, watch the mirror as your helper slides it along the wall and identify the instant either speaker’s driver becomes visible. Treat the first appearance of a driver as that speaker’s first-reflection location on this wall. Check the woofer or tweeter consistently, preferably the tweeter, because its position gives the most relevant high-frequency reflection geometry.
Continue the mirror’s travel without changing your seated posture, head position, or mirror height. Record each distinct position where the left speaker appears and where the right speaker appears. Don’t assume the locations will coincide: speaker spacing, toe-in, and your listening position can separate them. Then repeat the observation on the opposite side wall. Each speaker may become visible at a different point there. Verify every sighting from the same listening position.
Step 5: Tape the Marked Locations
Place a small piece of painter’s tape or a removable sticky note at every wall position where the mirror reveals either speaker’s tweeter from your normal listening seat. Keep each mark centered at the mirror location, rather than estimating from the speaker or using a area. As your helper moves the mirror at tweeter height, mark every appearance of left or right speaker.
Repeat the procedure along both side walls. Don’t assume the marks will be symmetrical: room geometry, speaker placement, and seat position can place the left and right reflection points differently. If you treat more than one listening position, repeat the mirror pass from each seat and label resulting marks by position. The marks provide a clear reference for each first-reflection location.
Step 6: Press Panels, Remove Tape
Use the tape marks to align each absorptive panel so its coverage includes the exact point where the tweeter appeared in the mirror. Center the panel on that mark, then secure it according to its mounting method. Make sure the panel extends beyond the mark in every direction, so small placement errors don’t leave the reflection point exposed.
Treat the side-wall marks first. These reflections are often strongest in a bedroom studio and may reach you 5 to 15 milliseconds after the direct sound. Repeat the alignment on both side walls and for every listening position you intend to treat. Once each panel is fixed, peel off the painter’s tape slowly. It releases cleanly, leaving the wall and your panel layout unobstructed. Confirm each mount is secure.
Play Mono Pink Noise
While seated at your normal listening position, play mono pink noise through one speaker at its usual monitoring level. Keep the signal routed to only that channel, with the opposite speaker silent, so you can evaluate its reflections independently. Ask a helper to move a mirror slowly along the side wall at the speaker’s height.
Maintain your head position and listen for the noise’s tonal and spatial changes as the mirror travels. When you can see the active speaker’s driver in the mirror, place a small tape mark at that location. This mark identifies a first-reflection point for inspection. Then mute the first speaker, send the same mono pink-noise signal to the other speaker, and repeat on the opposite wall. Match level and height precisely.
Fix Missing Speaker Reflection Marks
If you can’t find a reflection mark for one speaker, repeat the mirror pass slowly from your normal seated position. Keep the mirror at speaker height, and ask your helper to move it steadily along the side wall. Watch from the seat: the speaker must appear clearly before you mark its first visible point with removable painter’s tape or a sticky note.
| Check | Reassuring outcome |
|---|---|
| Mirror height | Accurate view |
| Viewing angle | Clear visibility |
| Left speaker | Confident mark |
| Right speaker | Complete coverage |
Don’t stop after one mark: inspect both speakers on this wall. Then repeat on the opposite wall at every listening position. Different seats can reveal different reflection locations, so each verified mark gives you confidence that your treatment plan addresses actual early paths.
Recheck Marks After Rearranging Furniture
Any change to speaker placement, seating, desks, chairs, or nearby furniture can shift first-reflection paths, so repeat the mirror test from your normal listening position after rearranging the room.
Have a helper carefully slide a mirror along each side wall at speaker height. While you remain seated, identify and mark every location where you can see either speaker. Use removable painter’s tape or sticky notes; don’t use permanent marks.
If the change altered your desk, chair, or speaker locations, repeat the check across the ceiling zone between the speakers and listening position. Install or reposition absorption panels so they cover the revised marks. Test every listening seat independently: a chair moved even slightly can create different visible speaker locations and consequently different first-reflection points.
Conclusion
By using the mirror trick, you’ve identified the earliest side-wall reflection paths that can blur imaging and shift tonal balance. You now have practical marks for placing absorption or diffusion without guessing. Keep your listening position centered, verify both speakers from the same seat, and test with mono pink noise after mounting treatment. If furniture, speakers, or seating move, repeat the procedure. Your room’s first-reflection control stays accurate only when these geometric relationships remain unchanged.