How to Replace Headphone Ear Pads on Popular Studio Models
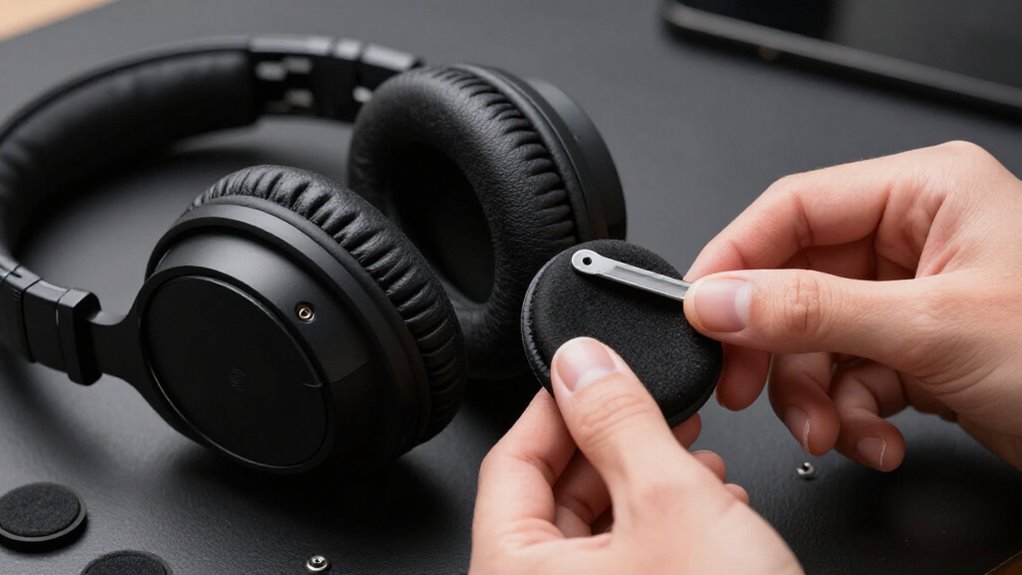
Power off your Studio headphones and disconnect audio and USB cables.
Confirm model and mounting style, clip, twist-lock, groove, or adhesive, before ordering pads.
Use a plastic spudger to lift one edge, then release the cushion around its perimeter.
Dry-fit and align the replacement, using the right USB-port cutout and left seam.
Press evenly for 30 seconds, test channels and seal, and inspect mesh for debris if buzz persists.
Further steps cover care and basic fault checks.
Comfort Restored in 15 Minutes
You can restore the comfort and seal of Beats Studio headphones in about 15 minutes by using pads made for your exact Studio version and handling the old cushions carefully. Before installation, identify each side. On versions with a USB port cutout, position the right pad so its bottom gap matches the port; use the left pad’s seam as its reference.
Remove the worn cushions gradually around their perimeter, preventing tears and mounting stress. If your kit recommends it, clean residual adhesive with alcohol wipes. Align every dowel and hole before seating each pad. Press firmly to secure adhesion, inspect for even edges and no gaps, then test fit and sound seal. Follow any specified conditioning time before wearing them for extended listening sessions.
Gather a Plastic Spudger
A thin, flat plastic spudger gives you controlled access to the narrow gap between the old ear pad and the headphone housing. Unlike metal tools, its non-sharp edge helps prevent scratches, gouges, and damage to the mounting ring or speaker housing. Select a slim tool with a flat tip, then use it methodically:
- Insert the tip gently beneath a lifted pad edge.
- Slide it around the perimeter in 1 to 2 cm increments.
- Ease adhesive or snap-fit sections free gradually, rather than pulling at one point.
- Keep pressure shallow and avoid forceful twisting.
For adhesive-backed pads, the spudger lets you separate the edge while preserving the foam. Don’t lever aggressively: excessive torque can bend the mounting ring or crack retaining tabs. Use an undamaged spudger.
Step 1: Disconnect Cables and Power Off
Before handling the ear pads, power off the Beats Studio headphones and disconnect every attached cable. This prevents accidental audio activity or power draw while you work around the ear cups.
For wired Studio variants, remove the detachable audio cable from the headphone, then disconnect its other end from the phone, computer, mixer, or other source. Unplug any USB cable used for charging, data, or power. Don’t leave a cable connected merely because the source device is switched off.
Place the headphones on a stable, clean table under good lighting, with the ear cups supported and cords clear of the work area. Inspect both connection points before proceeding. Confirm that no audio, USB, charging, or adapter cable remains attached. You can safely proceed now.
Step 2: Identify Your Ear Pad Mount
With the headphones disconnected, confirm the exact Beats Studio generation and inspect the ear pad’s edge where it meets the ear cup. Studio, Studio 2.0, and Studio Wireless variants can use different pads and mounts. Look for a clip-on plastic mounting ring, twist-lock tabs, a stretch-in groove, or an adhesive-backed interface. A clip-on design typically has retaining points around its perimeter; note whether its ring is integrated with the pad or seated on the cup. Twist-lock mounts show tabs or slots, while groove mounts wrap a skirt into a channel. For adhesive-mounted pads, don’t judge the dowel layout until the cup surface is clean and dry. Use gentle pressure. If resistance contradicts your identification, stop and reassess; force can crack tabs or deform the ring.
Step 3: Peel Pads From Retaining Lip
Begin at one small section of the ear pad and lift its edge gently from the retaining lip, pulling slowly around the perimeter rather than tugging the pad free at once. Keep the pad close to the cup as you peel, applying even force so you don’t bend or crack the lip. Advance a few centimeters at a time, checking that the mounting ring releases cleanly before continuing.
If adhesive resists, stop and use an alcohol wipe to soften the residue; then let the area dry before resuming. Don’t pull harder, since that can tear the pad material or create gaps on the lip. Once removed, inspect the retaining lip for adhesive, fragments, or debris. Clean and dry it; confirm the ring is intact.
Step 4: Align Dowels With Holes
Set the replacement pad against the speaker cup without attaching it, then match its mounting dowels to the corresponding holes. Perform a dry position check before applying pressure: confirm that each dowel sits directly over its hole and that you have the correct left or right pad.
On the right cup, use the USB port cutout as your reference for the bottom edge. Guide the top dowel into its hole first. Keep the pad level, then align the lower dowel with its opening and press it in. Check that both dowels are fully seated and the pad lies flat.
Press firmly around the entire perimeter to seat it flush and eliminate gaps that could reduce comfort or sound isolation. Do not force misaligned dowels.
Step 5: Rotate Pads Until Seams Align
Before applying firm pressure, rotate each replacement pad until its seam matches the headphone’s intended mounting orientation. This step establishes the pad’s correct clock position after you’ve aligned its dowels with the mounting holes. On Beats Studio-style models, use the USB-port cutout on the right earcup as your fixed reference. Turn the right pad until its cutout and seam occupy their expected positions.
For the left pad, use the seam as the bottom reference, since no USB cutout identifies that side. Perform a dry alignment: verify that seams, cutouts, and dowels visually correspond to each earcup. Don’t accept a nearly correct position; even a slight rotation can misplace the perimeter and leave uneven gaps. If alignment is wrong after contact, peel back and rotate.
Step 6: Press Edges for 30 Seconds
With the pad correctly aligned, press firmly around its entire perimeter for about 30 seconds to seat the adhesive or mounting ring evenly. Start at the corners and along the outer rim, where small gaps are most likely to form. Use your fingertips to walk around the edge in short, overlapping presses rather than applying force at only a few points. Maintain steady, even pressure as you complete the circle.
After 30 seconds, inspect the perimeter. The pad shouldn’t lift, wrinkle, or shift when you lightly check its edge. If you find a loose section, press that area again until it lies flush against the ear cup. Then repeat the same sequence on the second ear cup without disturbing the fitted pad. Bonding begins.
Test Audio on Both Channels
Once both pads are fully seated, and adhesive-mounted pads have completed their recommended pressure-conditioning period, play a bass-heavy track and compare the left and right channels. Listen for equal low-end weight and overall level; a proper seal restores the headphone’s intended bass response.
Then isolate each side with your device’s balance control or a recording containing distinct left/right cues. Check whether either channel sounds muffled or thin, which indicates a possible gap or pad misalignment. While playback continues, gently turn and tilt your head. Confirm both pads remain stable and channel levels don’t change with position. If one side is quieter, remove that pad and realign it carefully. Don’t force the mounting; correct placement creates a uniform acoustic seal before resuming normal monitoring or critical listening.
Buzzing: Debris; Clean Mesh
Buzzing in Beats Studio headphones often comes from dust, skin flakes, or other debris resting on the speaker grille rather than from a failed driver. Remove the pads and inspect each mesh under good light. Gently lift visible grit from the surface without poking or stretching grille fibers.
| Check | Method | Result |
|---|---|---|
| Mesh | Brush gently | Debris clears |
| Interior | Remove loose particles | Area stays dry |
| Pad seal | Seat evenly | Gaps disappear |
Clear the ear-cup interior, then let it dry completely before reinstalling the pads. Press each replacement pad into its mounting track evenly, and confirm that no edge gaps remain. Test both channels again. If buzzing continues, repeat the mesh inspection on each side before you classify it as an internal speaker fault requiring professional service.
Wipe Pads Weekly With Microfiber
Weekly microfiber wiping keeps Beats Studio ear pads free of dust and skin oils that can degrade the surface and weaken the acoustic seal over time. Use a clean, dry microfiber cloth at least once each week. Wipe the outer surfaces with light, even passes; don’t press oils deeper into the covering.
If the pads feel tacky, dampen a microfiber cloth lightly, ensuring it isn’t soaking wet. Wipe carefully, then air-dry the headphones completely before use. Never apply harsh solvents, which can damage pad material and compromise adhesive bonding points.
After cleaning, inspect each pad under good light for cracking, peeling, or flaking. Replace deteriorating pads promptly: maintaining an intact seal preserves comfort, bass response, and noise isolation performance during routine listening and travel.
Conclusion
Replacing your studio headphone ear pads restores seal, comfort, and channel balance without specialized service. You’ve identified the mount, removed the old pads without stressing the baffle, and seated replacements evenly around the retaining lip.
After pressing the perimeter, test both channels at low volume and inspect for buzzing or leakage. If noise persists, clean the mesh before reopening the cups. Wipe pads weekly with microfiber to limit oils, debris, and premature wear.