How to Build a Studio Desk With Rack Space on a DIY Budget
How to Build a Studio Desk With Rack Space on a DIY Budget
You can build a stable studio desk with 5U rack space in two days for about $544.32.
On day one, square and mark every cut, verify the 8.75-inch rack opening, dry-fit risers, and drill pilot holes. Cut, sand, test-stain, and finish the butcher block.
On day two, install adjustable legs, rails, braces, and plates; clamp joints square. Keep rail faces 19 inches apart, test-fit hardware, verify room clearance, and level glides. Continue for assembly checks.
Intermediate $544 Two-Day Desk
An intermediate two-day studio desk build can deliver a stable work surface and integrated rack space for about $544 when you lock down dimensions, hardware, and material choices before cutting.
Treat day one as layout and preparation. Mark every cut line in pencil, verify it with a square, and before running a saw. Measure the rack opening from hardware: five rack units equal 8.75 inches. Confirm bracket positions, rack angle, cable clearance, and screw paths before drilling pilot holes. Use an MDF top if it meets your stiffness needs, but seal exposed edges and support spans.
On day two, assemble with screws, corner brackets, and plates. Clamp joints, check for square, and wear eye and hearing protection. Allow finish coats to cure without rushing assembly.
Budget $544.32 Total Cost
With the two-day build plan set, you can hold the desk’s total near $544.32 by pricing each component before purchase and avoiding specialty studio-furniture parts. That approach keeps structural choices practical and leaves room for essential fastening hardware without sacrificing stability.
- Butcher-block top: about $219; verify flatness and inspect edges for damage before loading it.
- Four legs: 4 × $21.98; use unfinished poplar supports and confirm screw penetration won’t break through.
- Hardware and finish: buy corner braces, mending plates, screws, brush, sandpaper, and $19.98 PolyShades; cap finish at two coats.
Compare local prices, calculate tax before checkout, and retain a small contingency for replacement fasteners. Pre-drill pilot holes, use eye protection, and select screws that engage the support material securely without splitting wood.
Step 1: Cut and Stain the Desktop
Cut the butcher-block desktop to its final dimensions before finishing, supporting the work fully and using a straightedge to verify a clean, square cut. Rough-cut slightly oversize, then make the final pass with the panel secured and your hands clear of the blade path. Sand progressively, beginning near 150 grit, until the surface is level and free of milling marks. Remove dust with a vacuum and tack cloth.
Test Bombay Mahogany stain on an offcut from the same wood. Brush or wipe stain with the grain; leave it about 30 seconds for a lighter tone, or longer to deepen color. Wipe excess. Let stain dry for several hours. Apply at least two varnish coats with a quality brush, allowing each coat to cure as directed.
Step 2: Install Four Adjustable Legs
Position the desktop upside down on a padded, flat surface, then lay out the four adjustable-leg mounting locations near the corners according to the leg manufacturer’s edge-clearance requirements. Mark each plate, then pre-drill every hole to the appropriate depth. Choose screws that bite securely into the desktop without penetrating its finished face. For MDF or plywood, place washers under the screw heads to spread the load and limit pull-through.
Set all four legs to approximately equal heights before tightening. Use a framing square to confirm each corner is square to its mounting plane, then tighten the fasteners fully. With help, turn the desk upright.
Gently press each corner and adjust the feet until every leg bears evenly and wobble disappears. Keep fingers clear while rotating the desktop.
Step 3: Mount Rack Rails Beneath Riser
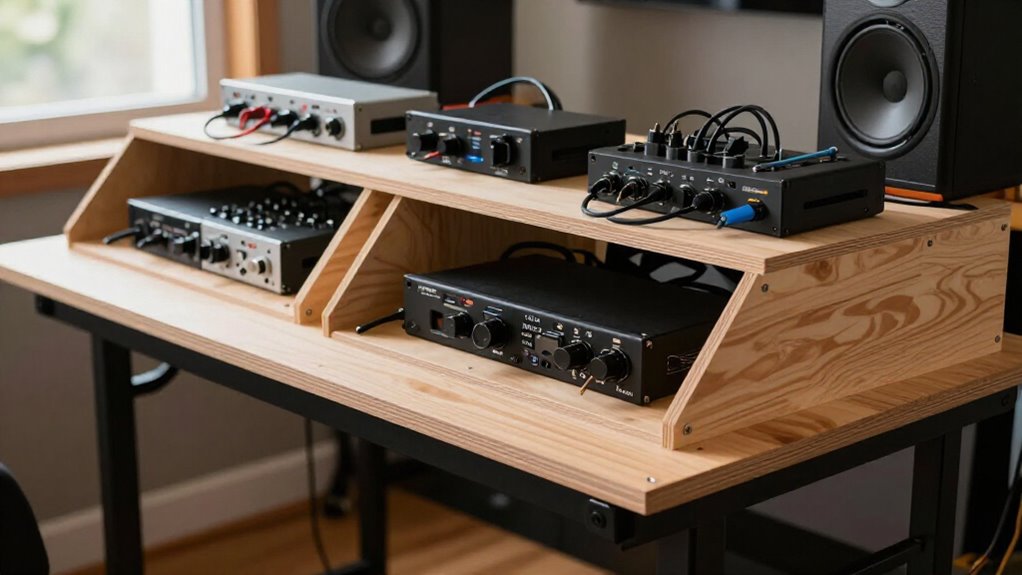
After leveling the desk, mount the rack rails beneath the riser so each 5U bay stays parallel to the desktop and follows standard rack spacing. Mark each rail location on the riser underside, centering it within the diagonal shelf geometry. Use a square and straightedge to verify that opposing rails match in height, depth, and angle. Pre-drill pilot holes to prevent wood splitting.
Choose screws that bite securely into the riser but cannot break through its top face. Install a consistent pattern, three screws at each rail position works well for heavier equipment, and tighten them evenly to limit flex. Before final tightening, slide in a rack-unit mockup and confirm usable depth and the 5U opening. Recheck both rails with a straightedge before loading any gear.
Step 4: Assemble Dual Top Risers
Before applying any finish, dry-fit the two riser pieces on the butcher-block top and confirm that their combined footprint, height, and spacing support your monitors or speakers without obstructing the angled rack shelves. Center the assembly as planned, then use an aluminum framing square to check each corner for square and verify that both bearing surfaces sit flat. Adjust twist, gap, or uneven contact before drilling.
Mark brace locations where hardware won’t protrude through the top or contact equipment. Predrill pilot holes with a bit sized for screws and wear eye protection while drilling. Fasten corner braces or mending plates to join risers and top, tightening gradually and alternating sides to prevent shifting. Once secure, remove pieces, sand, and apply the same finish coats.
Step 5: Check 19-Inch Rack Alignment
With the risers dry-fitted, establish the rack opening from a true 19-inch reference rather than from the nominal 5U layout. On each 45-degree side panel, position the 5U rails so the inside rail faces measure 19 inches apart. Use a 19-inch template; a tape measure is acceptable if you read it square to both faces. Check the diagonal shelf layout, since angular errors can pinch the opening.
Mirror the mounting-hole orientation and screw spacing on both rails, keeping their faces parallel. Then check the rail plane against the desktop and monitor bridge. On angled or stepped surfaces, confirm the rails remain level and plumb for the equipment’s intended position. Dry-fit a rack unit or reference bar to confirm it enters squarely without twisting or binding.
Step 6: Tighten Bolts, Vacuum Sawdust
Keep the rack hardware in its test-fitted position and tighten every bolt and screw fully, working in alternating passes so the rails stay aligned under the load of installed gear. Check rail spacing and level against CAD dimensions. If it shifts, loosen fasteners, correct it, and retighten before loading. Keep the drill or driver square to MDF and wood; an angled bit can strip a pilot hole, particularly beside angled shelf side panels.
Wear eye protection and a dust mask; vacuum immediately after drilling, cutting, or sanding. Clear dust from joints, bracket faces, and screw points so hardware seats flush and threads bite cleanly. Vacuum these areas again just before stain or varnish; residual powder weakens adhesion and can leave uneven finish around hardware.
Verify 77-Square-Foot Studio Fit
How will the finished desk function inside a 77-square-foot studio, not merely fit on paper? Measure the usable room boundary and lock the desk and rack dimensions into your cutting-layout drawing. A 60 by 30-inch top equals 12.5 square feet; subtract that from 77 before adding clearance buffers.
Count rack sections separately, including their lateral stance space, whether they sit beside or under the top. Then verify line-of-travel dimensions: chair swing, keyboard movement, entry paths, and access to fixed gear mustn’t overlap. Position monitors and speakers with adequate clearance, and preserve cable bend radius and routing space behind them.
Confirm you can reach rack controls and exits without obstructing walkways. Keep power and signal leads protected from chair casters, sharp edges, and pinch points during use.
Wobble: Adjust Leg Glides
Once the desk layout clears the room’s paths and equipment, level the frame before loading it with gear. Install adjustable leg glides to correct shallow floor dips; don’t rely on shims. Press each corner and diagonal firmly. If one corner lifts, loosen its related glide and turn it a few rotations until movement stops.
| Test | What you see | Action |
|---|---|---|
| Front left | Corner rises | Loosen glide |
| Front right | Corner rises | Loosen glide |
| Rear left | Corner rises | Loosen glide |
| Rear right | Corner rises | Loosen glide |
Verify every leg base meets the floor with no visible gap. Then secure glide hardware and leg-to-wood brackets. MDF can compress under load.
Install the tabletop, bridge, and rack components, then repeat the corner test before placing equipment on its surface.
Reapply Stain After Scratches
If a scratch cuts through the stained finish, sand only the damaged area smooth, remove all dust, and reapply the same stain to restore the color. Feather the repair edge with abrasive, working with the grain, and wear a dust mask and eye protection.
Apply Minwax PolyShades Bombay Mahogany sparingly using lint-free cloth or brush. Match your original contact time, about 30 seconds for a lighter tone, then wipe excess evenly. Test the color on an offcut first; repeated applications can create a darker spot. Let the oil-based stain dry for the same interval used during initial finishing, typically several hours, before clear coating. Don’t trap moisture beneath varnish. If varnished, scuff repair, remove dust, and add sufficient coats to restore protection and blend satin sheen.
Conclusion
You’ve built a compact studio desk with integrated rack space for $544.32, using careful cuts, adjustable legs, and securely mounted rails. Before loading equipment, confirm every bolt is tight, rails are level, and leg glides eliminate wobble.
Vacuum remaining sawdust, protect the stained surface, and allow finishes to cure fully. Place the desk within your 77-square-foot studio, route cables safely, and inspect it periodically. Touch up scratches promptly to maintain durability and appearance over time.