Do You Need a Pop Filter? How It Stops Plosives in Your Vocals
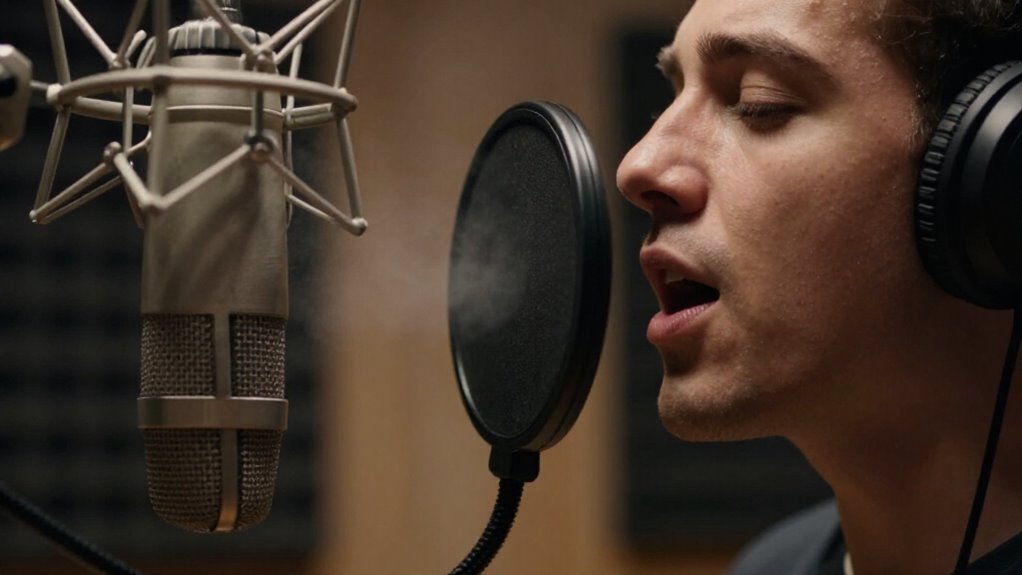
You’ll want a pop filter for close vocal recording, especially with condensers, because it diffuses concentrated air bursts from P and B sounds before they overload the capsule. It also helps keep saliva and moisture off the grille.
Place a nylon or metal screen about two inches in front of the mic, centered and slightly off-axis. It won’t reliably tame sibilance or outdoor wind. More placement and testing details can further refine your results.
Tame P- and B-Sound Bursts
P- and B-sounds create plosives: short bursts of air that can strike a microphone diaphragm and produce low-frequency pops or distortion. A pop filter disperses this airflow before it reaches the diaphragm, so you capture cleaner vocal takes without harsh thumps. Position the filter between your mouth and microphone, generally 2 to 6 inches from the mic, while maintaining a comfortable speaking distance behind it. For forceful consonants, rotate the filter about 30 to 45 degrees to deflect the air rather than letting it travel straight through.
You can also speak slightly off-axis, aiming your voice past one side of the capsule instead of directly at it. Test carefully by repeating words such as “paper,” “people,” and “baby,” then adjust until bursts don’t noticeably overload the low end.
Blocks Saliva From Capsules
Beyond controlling plosives, a pop filter places a physical barrier between your mouth and the microphone capsule, catching saliva droplets that close-mic speech can eject. This barrier limits moisture accumulation on the capsule and grille, helping protect sensitive components and potentially extending the microphone’s service life. Keeping conductive droplets away also may lower the chance of moisture-related electrical shorts, particularly during long vocal sessions.
After each use, inspect the filter for visible spit, makeup, dust, or other debris, especially if you’ve recorded close to it. A dirty screen can become less hygienic and may affect airflow. If you use a nylon filter, hand-wash it gently in mild soapy water, rinse it thoroughly, and let it air-dry completely before reinstalling it. Never reinstall it damp.
Place It Two Inches Away
Position the pop filter about 2 inches (5 cm) in front of the microphone capsule so it can disperse plosive air pressure before it reaches the mic. Keep it centered between your mouth and the capsule, covering the area where your voice projects. This gap lets airflow spread while preventing contact with the microphone. Set a consistent vocal distance, then record phrases with hard P and B sounds.
Listen for low-frequency bursts or overload. If pops remain, angle the filter slightly to deflect the air stream away from the capsule. Treat two inches as a starting point, not a fixed rule: adjust the mount in small increments and compare takes. Secure the gooseneck after each change, ensuring the filter stays aligned without blocking your view.
Nylon Mesh vs. Metal Screens
Nylon mesh gives you reliable, affordable plosive diffusion, though it can slightly soften high frequencies. Metal screens may retain more top-end detail and withstand washing, but they cost more and can introduce subtle ringing artifacts. Choose nylon for dependable budget control or metal when you need a tougher, reusable screen.
Sound Transparency Compared
Although both types control plosives effectively, nylon mesh can absorb a small amount of high-frequency energy, which may slightly soften a vocal’s top end. In practical recording, this attenuation is usually barely noticeable, particularly after normal microphone placement and processing. Still, if you’re recording an airy, detailed voice or relying on a bright condenser, nylon can make the result feel marginally less open.
Metal screens are often marketed as more transparent because their open structure can preserve more high-frequency detail. You’ll hear the difference readily in controlled comparisons with a revealing microphone, quiet room, and minimal EQ. However, metal doesn’t guarantee neutrality: some designs can produce subtle ringing or other artifacts. Choose nylon when you want reliable, budget-friendly control; choose metal when detail matters.
Durability and Cleaning
Durability often determines which pop filter makes the most sense for your recording setup. Nylon mesh is affordable and effective, but it can stretch, tear, or lose tension sooner than a metal screen. Metal screens withstand regular handling, generally last longer, and tolerate washing with mild soap and water.
| Type | Routine care | Deep cleaning |
|---|---|---|
| Nylon mesh | Wipe with a gently damp cloth | Hand-wash gently in soapy water; rinse and air-dry fully |
| Metal screen | Inspect for buildup | Wash with mild soap and water; dry before use |
| DIY nylon stocking | Check tension and damage | Replace if worn; it is less durable and precise |
After each session, inspect either filter for residue, dust, or debris. Don’t reinstall nylon while damp, since moisture can affect condition and hygiene.
Choosing the Right Screen
Choosing between nylon mesh and metal screens comes down to budget, cleaning needs, and the amount of high-frequency detail you want to retain. Both types disperse plosive airflow before it reaches the microphone capsule, while staying acoustically transparent enough for vocal work. Nylon mesh is the practical default: it costs about $20, performs reliably on most sessions, and gives you effective protection without stretching your budget.
Its mesh can slightly soften high frequencies, however, so it may not suit every bright vocal or detail-critical chain. Choose a metal screen when you need a tougher, washable filter and want to preserve more top-end detail. Expect to pay roughly $50 on average. For everyday home recording, nylon remains a proven choice; metal suits frequent use and cleaning.
Dynamic Mics May Need Less
Dynamic mics offer more built-in plosive resistance than sensitive condensers, but close “P” and “B” bursts can still overload your recording. You’ll benefit from a mesh pop filter when you work close to the capsule, because it disperses airflow before it creates a low-frequency thump. If you don’t use a filter, keep some distance and aim the mic slightly off-axis; a foam windscreen helps, but it won’t control close-range plosives as effectively.
Built-In Plosive Resistance
Many dynamic microphones already reduce plosives before airflow reaches the capsule. Layered metal mesh, internal foam, and shaped headbaskets slow and diffuse the high-pressure air pulse created by P and B sounds. This protection lets you work closer to the grille without sending the full blast directly into the diaphragm.
The Shure SM58 uses a ball grille and internal screening, while the Electro-Voice RE-20 and Shure SM7B use multi-layer assemblies that limit wind and breath energy. The omnidirectional Electro-Voice RE50 pairs its pattern with a purpose-built headbasket, which helps explain its interview use. You should still treat these systems as attenuation, not elimination: forceful, close-range consonants can exceed their airflow control. Compared with a large-diaphragm condenser, your dynamic mic generally tolerates vocal airflow better.
When Filters Still Help
Even with a dynamic mic’s built-in grille and foam, close vocal work can still drive a P or B burst into the diaphragm and create a low-frequency thump. A pop filter disperses that airflow before it reaches the capsule, reducing the energy that causes audible plosive impact. Dynamic models usually need less protection than sensitive condensers, yet their screens don’t eliminate every burst.
| Situation | What you hear |
|---|---|
| Close vocal | Thump on P/B |
| Persistent plosives | Add a filter |
Use the filter when close takes reveal thumps despite the mic’s headbasket. It adds a repeatable airflow barrier without changing the mic’s basic tonal character. For spoken vocals, test a few forceful phrases and listen for subsonic hits that may overload your preamp or obscure later processing.
Mic Distance And Angle
Filter choice works best alongside placement: set the pop filter roughly 2 to 6 inches (5 to 15 cm) from the microphone, with a small air gap between the screen and grille. That spacing lets the filter slow bursts of air before they reach the capsule. Aim the mic slightly off-axis, or place it just above your mouth and tilt it downward, so plosive airflow travels past rather than directly into the capsule. If you produce forceful P, B, or T sounds, angle the filter 30 to 45 degrees to deflect air without blocking the vocal path.
Dynamic mics need less external protection than sensitive condensers, but don’t rely on that alone. Test phrases, then adjust distance and angle. If it sounds bass-heavy, move farther away to reduce proximity effect.
Rap Vocals and Audiobook Narration
Close-mic rap vocals and audiobook narration both expose plosive bursts from “p” and “b” sounds, creating low-frequency thumps that can overwhelm an otherwise clean take. For rap, you’ll often work close to the capsule to retain intimacy and impact, so airflow control matters. Position a nylon or metal mesh pop filter 2 to 6 inches from the microphone and angle it slightly off-axis.
This disperses the breath blast while keeping your voice clear. Use the same setup for narration, where repeated close-up phrases can create distracting pops and force retakes. Don’t rely on a foam windscreen alone; it’s generally less effective against close-range air bursts. Monitor through headphones or full-range speakers during tracking. Small speakers may hide the thumps, leaving you with problems you won’t catch until editing.
Doesn’t Tame Sibilance
A pop filter controls plosive airflow, not the sharp high-frequency energy of sibilant “s” and “sh” sounds. When you pronounce p or b, the filter disperses the air burst before it reaches the microphone diaphragm. Sibilance works differently: it creates concentrated high-frequency noise, while plosives produce a low-frequency thump when air overloads the mic.
Some filters slightly soften top-end detail, but that incidental attenuation won’t consistently control harsh esses. Position the microphone slightly off-axis or adjust its angle to reduce direct sibilant energy during tracking. If the vocal still sounds piercing, use a de-esser to target the offending frequency range without dulling the entire performance. Set it while monitoring the vocal in context, then apply only enough reduction to restore clarity and comfort naturally.
Pop Filters Aren’t Windscreens
Sibilance and wind noise require different tools, so don’t treat a pop filter as a windscreen. A pop filter uses mesh or thin metal between your mouth and microphone to disperse concentrated “p” and “b” bursts before they reach the capsule.
- Use a pop filter for close-mic vocal plosives.
- Use a foam windscreen outdoors to reduce broad wind noise during interviews, concerts, or film shoots.
- Don’t expect foam to stop concentrated airflow reliably; vocal pops can remain.
- Avoid thick foam for critical vocals when possible: it can attenuate high frequencies, making your recording muffled without fully controlling plosives.
For close-mic vocals, position the pop filter between you and the mic. Add a windscreen only when outdoor wind protection is also necessary on location shoots.
Record a Plosive Test Phrase
Start with a controlled plosive test to hear exactly how your microphone handles bursts of air. Record a short line loaded with P sounds, such as “Peter Piper picked a peck of pickled peppers,” so you can identify each air burst clearly. Add B, T, D, K, and G sounds to test the microphone’s response across the full plosive range.
Keep your mouth-to-mic distance, angle, input gain, and speaking level unchanged between takes. First, record with the capsule directly in front of your mouth. Then install the pop filter and repeat the same phrase without moving either position. Monitor both takes on headphones and listen closely for low-frequency thumps or pops, especially immediately after P and B consonants. Note whether the filter reduces those bursts.
Conclusion
You’ll get cleaner vocal takes when you control plosives at the source. Position a pop filter about two inches from the microphone, then keep your mouth several inches behind it and test phrases with P and B sounds. Choose nylon or metal based on durability and tone preference, especially for rap or narration. Remember: a pop filter won’t fix sibilance or replace a windscreen outdoors. If your dynamic mic handles bursts, you may need less filtering.